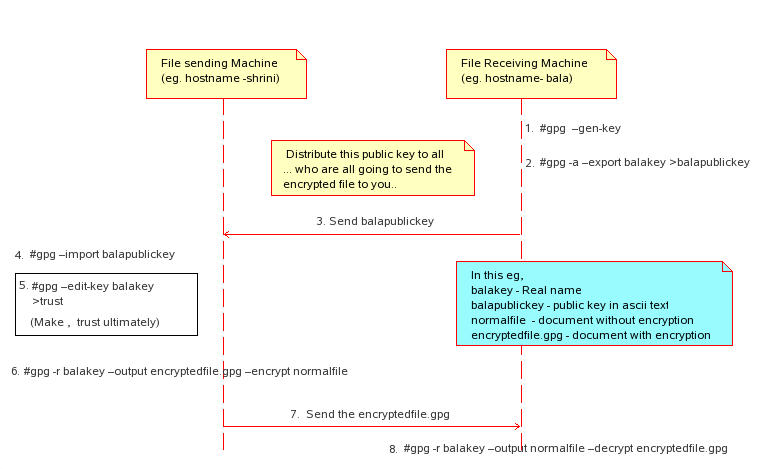
CVS, Concurrent Versions System, is a centralized Revision Control System (RCS). SourceForge.net provides CVS service to all hosted projects. In order to access our CVS service, you will need to install a CVS client. CVS allows developers to keep a historical record of changes made to their source code tree, and to allow multiple developers to work on a single set of files at the same time without accidentally overwriting changes made by other developers.
WinCvs Overview
WinCvs is a CVS client that runs on the Microsoft Windows platform. WinCvs is an advanced CVS client that provides an expert level of control over CVS operations.
How does WinCvs differ from other Windows-based CVS clients?
WinCvs is designed to allow for maximum power and flexibility for the advanced CVS user.
WinCvs provides access to all CVS operations from an interface that is easier to use than the command line CVS client. WinCvs is designed for interactive use and not for scripting the operations of CVS.
Getting WinCvs
You can get the setup file from
http://cvsgui.sourceforge.net/download.html
Installing WinCvs
( This is for novice user , advance user no need to read this just skip this
part )
To install WinCvs, read these instructions fully, then do the following:
1.Download the latest stable release of WinCvs.
2.Unzip the file downloaded from the CvsGui project (A compression utility such as 7-Zip is necessary to extract the setup program from the zip file downloaded with some versions of Windows).
3.Run the WinCvs installer program extracted from the downloaded file, wincvs_setup.exe.
Close all other open programs except for the WinCvs installer and then click on the 'Next' button.
4.Read the license text if you are unfamiliar with it, select the 'I accept the agreement' radio button and then click on the 'Next' button.
5.This screen displays useful information about the WinCvs applicaion. It also provides details on optional Windows components that are required for certain users. Once you have done so, click on the 'Next' button.
6.Review and alter the installation path for WinCvs if necessary. The default path is the ideal location for most users. Then, click on the 'Next' button.
7.Select the 'Full installation (recommended)' installation component pull-down and click on the 'Next' button.
8.Review and alter the Start Menu folder to be created for WinCvs as needed (the default option is recommended and shouldn't be changed for most users), and click on the 'Next' button.
9.Modify any icon and shell context menu options as desired (again, most users shouldn't have a need to modify these), and click on the 'Next' button.
10.Review the selected installation options and then click on the 'Install' button if they are correct. If not, go back and correct any incorrect settings.
11.Make sure the 'Install CVSNT' option is checked and click on the 'Finish' button.
Click on the 'Next' button.
12.Review the license agreement (the GNU GPL) and then select the 'I accept the agreement' radio button. Then, click on the 'Next' button to continue.
13.Review and alter the installation path for cvsnt if necessary. The default path is the ideal location for most users. Then, click on the 'Next' button.
14.If a warning box comes up, notifying you that the folder exists where you are trying to install cvsnt, select 'Yes', as you do want to overwrite it.
15.Select the 'Full installation' component method (this is not the default, you will have to select the option from the pull-down menu), then click on the 'Next' button.
Review and modify the Start Menu options for cvsnt (the defaults should be fine for most users), then click on the 'Next' button.
16.Make sure the 'Generate default certificate' option is checked and click on the 'Next' button.
17.Review the installation options and use the 'Back' button to fix any mistakes. Then, click on the 'Install' button.
18.Click on the 'Finish' button
19.You must restart the computer to start using WinCvs. If you wish to use it now, select the 'Yes, restart the computer now' radio button. Otherwise, select the 'No, I will restart the computer later' radio button, and restart the computer before trying to configure WinCvs.
SSH Client (Putty)
PuTTY is a great SSH client which, in its latest version (0.52 at the time of writing), supports tunnelling making it elligable for use with WinCVS.
Get the Putty setup file from
http://www.chiark.greenend.org.uk/~sgtatham/putty/
There is no installer for PuTTY. Just download the executable from the home page and double click on it.
PuTTY initially displays a dialogue that allows you to specify the parameters for the connection. You will need to tell PuTTY to use SSH -- defaults to Telnet.
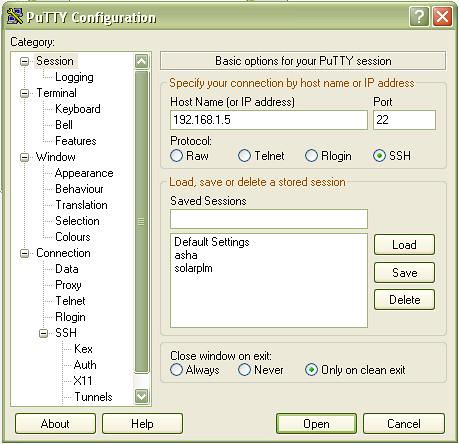
You also need to set up the tunnelling. Flip to the Connection->SSH->Tunnels
page and make a tunnel local tunnel on port 2401 like this:

First, click the Add button and then click the button open then you will get the login screen.Enter Username and Password. You can do anything with ssh client.But remember your localhost 2401 port is tunneled (mapped) to that remote host.
Setting WinCvs Client
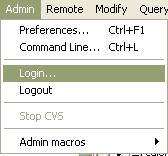
Launch the WinCVS client. The first time, it will ask you the basic configuration preferences that it needs. Select login option in menu,
It need CVS repository location and authentication information. The screenshot below tells you what you should enter.
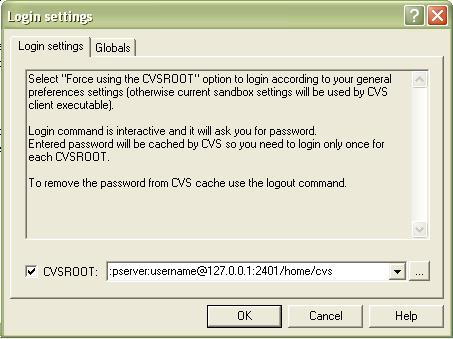
If you click OK button you will get the following CVS login Screen.
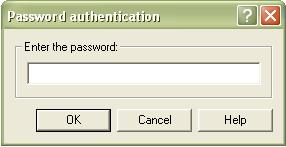
Enter the password, And then you can do checkout,import,export,update,commit anything...
Reference
http://www.chiark.greenend.org.uk/~sgtatham/putty/
http://cvsgui.sourceforge.net/download.html
http://ximbiot.com
http://www.apache.org/dev/cvs-on-win32.html